
New to C#? Stop! Before you go on, I highly suggest you learn the basics of C#. It is important to understand the difference between Unity and C#, because while you could learn C# while using Unity, it is not suggested. There are certain key differences you need to understand when working in one or the other, even if you don’t plan on working on C# outside of Unity. You don’t need to be a master, but to understand some basic concepts, I suggest you go read my C# tutorials.
The new input system Unity released into preview in 2019 is a heavy improvement on the old, however it can be a bit of effort to setup. This tutorial will go over the basics on setting up the input system, and integrating it into your code.
Installing
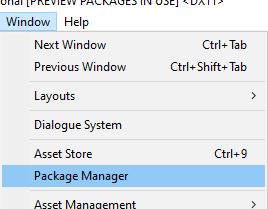
First thing you’ll need is the actual input system. At the time of writing, the input system is still in preview, and you have to opt in to use it. First you’ll need to go to the package manager, which you can find under window.
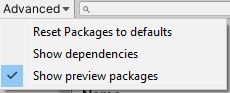
Under advanced, you’ll want to make sure you can see preview packages.
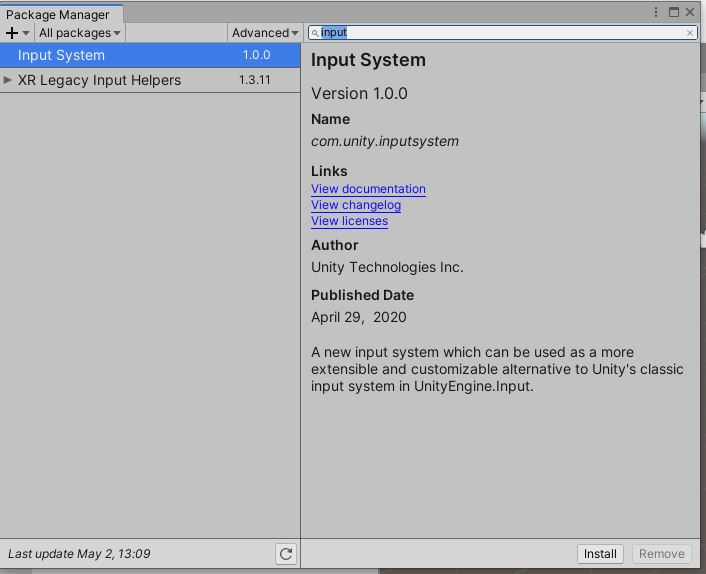
Then you’ll want to scroll down, or search, and find the input system entry. There will be an option to install, select it.
Afterwards it will load in files, and then come up with this. Go ahead and hit yes.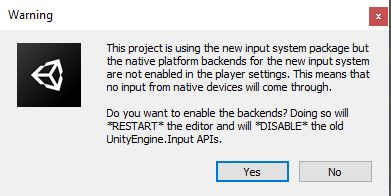
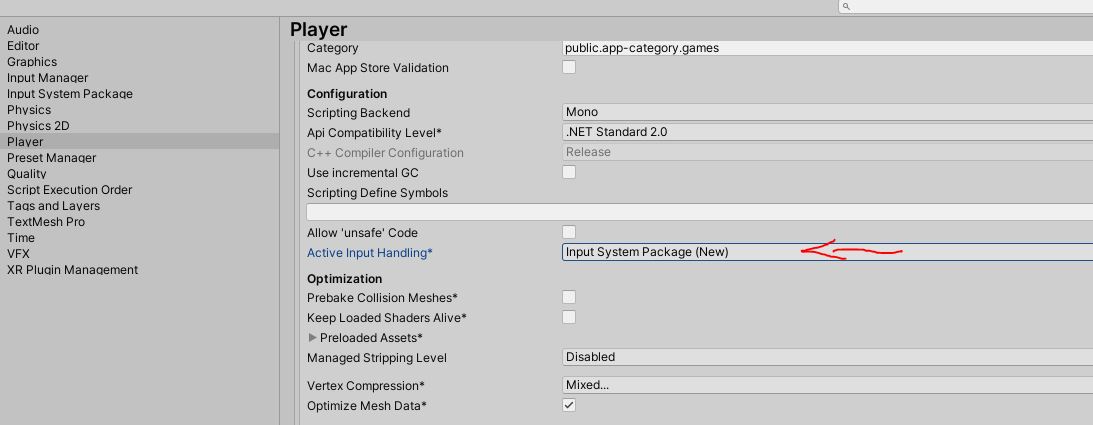
Your editor will restart, this may take some time, but eventually after it opens back up you’ll be ready to go. Almost. Confirm that the new input system is enabled, go to player settings (Edit > Project Settings) and confirm that the Active Input Handling is set to Input System Package as shown.
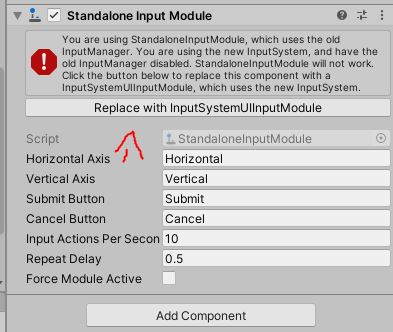
The last thing you’ll need to do is remove any existing old-input code from your project. You’ll get errors if trying to use it and the new input system at the same time. Additionally, if you have any EventSystems for your canvas, you’ll have to upgrade them. Luckily Unity provides an easy automated way to do this if you select it. If you don’t do this, your UI will no longer work with any input.
With this, everything should be setup to start using the new input.
Great… now what?
So we will go over the basics. If you want to get something working really quickly, you can use the new input method to replace what you may have removed from the old system. While I don’t suggest this for the long term, it’s easy enough to use to get started.
Any time you use this new system, you will have to add a new using namespace to the top of your code. using UnityEngine.InputSystem;, without this Unity won’t know what you’re doing.
From here you’ll have access to several new classes, most of which I won’t cover. There is some Unity documentation here if you’d like to dig into this part deeply.
I will cover the basics very briefly, specifically the two classes Keyboard and Mouse, which allow you to access specific keys and inputs on the fly similar to the old system. For example, if I wanted to check if the spacebar was hit, I could do:
private void Update()
{
    if(Keyboard.current.spaceKey.wasPressedThisFrame)
    {

    }
}
You have similar functionality for the Mouse class.
Getting to the Good Stuff
Now lets move onto Input Actions. This is essentially a manager that can create a C# class that works based on callbacks via delegates. If you’re unfamiliar with delegates, or need a reminder, I suggest you read this tutorial.
First in your project assets folder, right click and go to create, at the bottom you’ll see an option for Input Actions as shown.

Name it whatever you like, my personal preference is InputMaster. You will then have an asset, double click it and it will open the input manager window for this Input Action instance. You could create multiple if you wanted to. You can leave this window as a solo window, or dock it somewhere. I moved it to dock in my main window view.
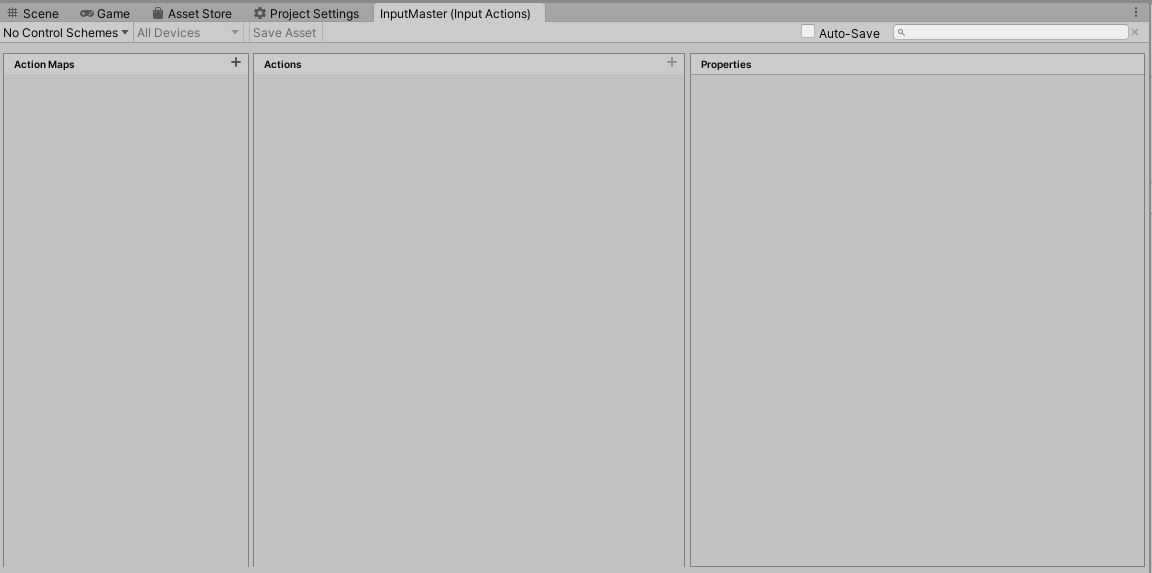
Theres a lot of options here, so we’ll touch on the basics to get things running.
Control Schemes
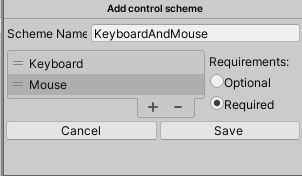
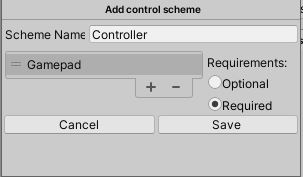
Control schemes will help us organize our project based on the type of input. So we of course have something simple like keyboard and mouse, but lets say we also want controller input, or mobile input. We can create control schemes for all of these. In this example I will be creating two control schemes, one for keyboard and mouse, and one for controller. Do note this is not required, but it helps to keep things organized.
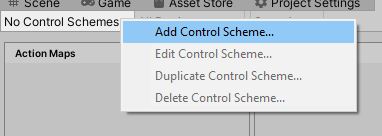
So if you want to follow along, at the top left it will show no control schemes. Simple click that, and hit Add Control Scheme.
From here you will be able to fill out a name, and it will show a list below you can add or remove from. This list will hold the type of inputs it has. Once you’re done with that control scheme, hit save.
If you’re adding controller, you may notice there are specific controller types (referred to as GamePad in this), for Xbox, versus the Switch Pro Controller, etc. I will be using the generic GamePad, which should function for them all, but you may need to create multiple if your game functions different on different types of gamepads.
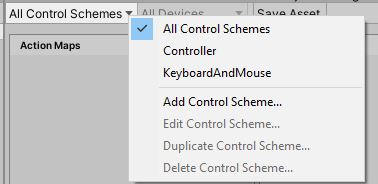
Now that the schemes have been created, pressing the type at the top left will now show you your schemes. Selecting a specific scheme will show only actions from that scheme, we will be able to see this in effect later. For now, select All Control Schemes.
Adding Actions
Next we have the three main sections of our input action.

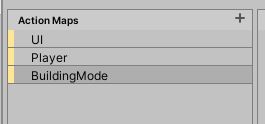
Action Maps
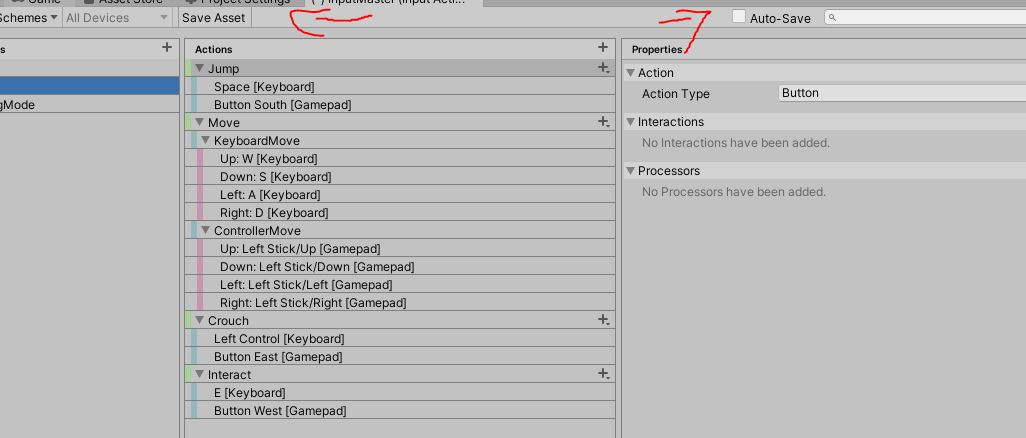
Here is basically sorting our actions into categories. So lets say we have input for our UI (moving our cursor between UI via keyboard, or controller, instead of clicking on it), input for our player, and input for perhaps some building mode or other feature. Here we can organize it by each type. Pressing the + next to it will create a new map, and you’ll be able to name it appropriately. It will also create a default action, feel free to delete that.
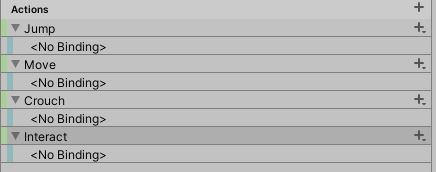
Actions
Here’s where we’re going to start getting into the specific actions. These are the actually actions that will be performed. So for a player it might be movement, jumping, interacting with something, crouching. Like the action map, hit the + and it will add a new item you can rename, as well as an input binding below. We will set that briefly.
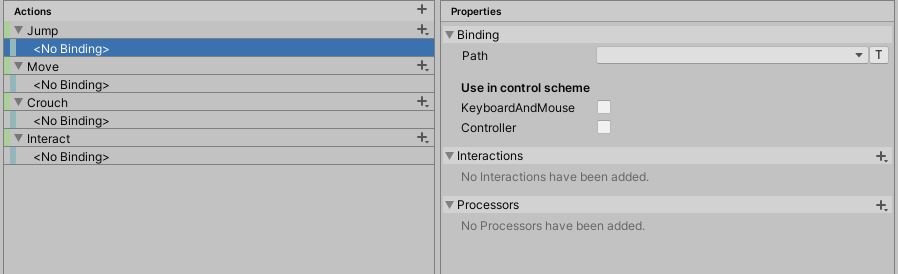
Properties
Here is probably the most important section, the previous areas are great for organization, and then properties sets the actual data to be used. If you select the action (the green named option, not the binding below it), you will see a simple screen just displaying the type of input. The three options consist of a Button, a Value and Passthrough. You can read about how each of these input types work in the Unity documentation here.
There are also interactions and processors that you can use to manipulate your input returns and values. Read about interactions here, and read about processors here.
Bindings
Bindings are the bread and butter of input. Select one of your action bindings and you’ll see a few options.
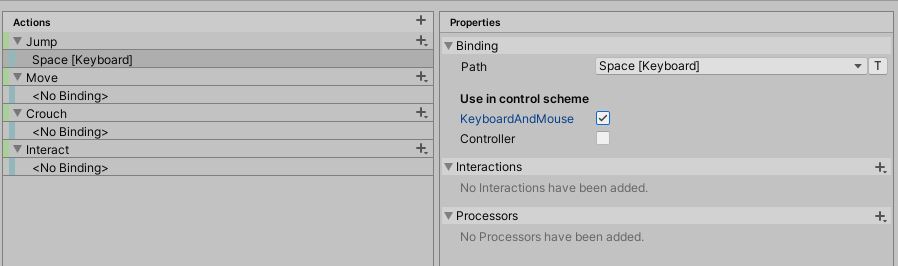
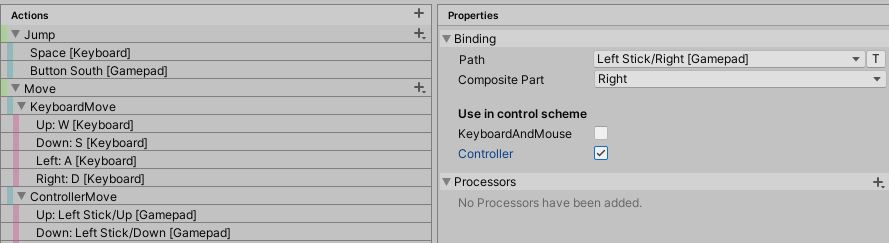
The path is the actual input. So for Jump this may be spacebar. Then the control scheme is the sorting mentioned earlier. We won’t want this to be a controller input of course, so we’ll select the KeyboardAndMouse checkbox.
You’ll see it update in the input actions to keep easy track of everything. Now we need to add input for our controller. You may notice the + next to each individual input, pressing that gives you several options to explore. All we need for this is to select add binding.

This adds a new empty binding, similar to before I can now set the controller jump options.
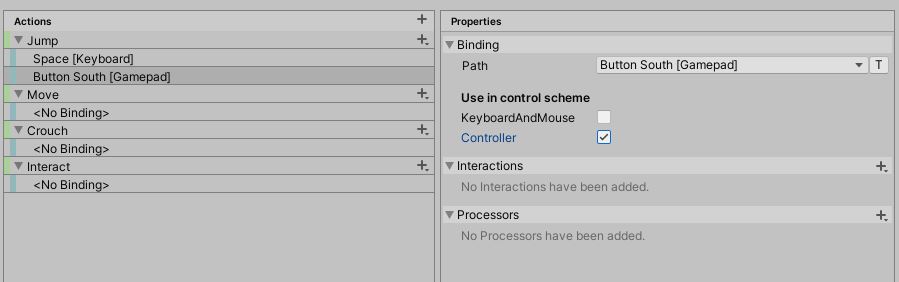
Now the settings are setup for Jump! You can also switch control schemes back and forth between various options, and you’ll see it toggle between showing only one type or another.
Now, setting up different types of inputs varies. For movement, its ideal to return a Vector2, so you get how much was moved up versus down. Here on the move I change the Action Type to Passthrough, and the Control Type to Vector2. Then, when I select the + on the move to add a binding, I have a new option for adding a new Vector2 composite.
A composite is essentially putting a bunch of bindings into one value that can be delivered as a single data type. So here I made the keyboard movement composite, and then I assign each to their relevant keyboard controls.
The rest of the options are fairly simple, or can be explored via experimentation or reading the documentation. So I will fill out the rest, and then we’ll move onto implementing this into code.
The last important thing is to make sure you save. Theres an auto-save option, however personally I’ve found this to be a bit annoying and slow. Theres a save option in the UI.
Getting Into Code
Now that all of our inputs are setup, we need to actually add it into the game. First what we’ll need is a way to hook this into our code, and Unity provides a way to generate a C# class out of this. If you select the asset, you’ll see a Generate C# Class toggle option, pressing it gives you a few options for naming, and then you can hit apply to create it.
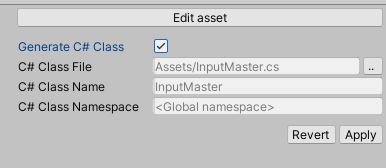
After hitting apply, a new C# class will be created in the indicated file. We now have everything we need to get started.
Using the C# Class
There are a lot of options for how you might structure a system to work with this input source. I’ll go over the basics of how it works, and then give some suggestions on ways I’ve implemented it.
The file generated creates a C# class that will need to be initialized with a new instance. So lets make our own C# class that does this, it doesn’t need to be anything special.
public class InputHandler : MonoBehaviour
{
    private InputMaster inputMaster;

    private void Awake()
    {
        inputMaster = new InputMaster();
        inputMaster.Enable();
    }
}
So here we create a private variable for the input master instance, note that it is not a Monobehaviour. So a new instance is created in Awake(), and then we enable it. It needs to be enabled from the start, otherwise it won’t work. It’s also probably best to Enable/Disable it in OnEnable/OnDisable respectively.
From here we can add our callbacks to do different actions based on our input. Lets setup some Debug.Logs to watch it work at a basic level.
using UnityEngine.InputSystem;

public class InputHandler : MonoBehaviour
{
    private InputMaster inputMaster;

    private void Awake()
    {
        inputMaster = new InputMaster();
        inputMaster.Enable();

        //Callbacks
        inputMaster.Player.Jump.performed += Jump_performed;
    }

    private void Jump_performed(InputAction.CallbackContext obj)
    {
        Debug.Log("Jump!");
    }
}
The input system is broken out into pieces. So at the base level, you can access each action map we setup earlier. In my case this would be either UI, Player, or BuildingSystem.
Then from there, we can access each action. Here I’m accessing our Jump action, but we also have others such as Move, Crouch, and Interact. Then I access the performed delegate, this is where we assign our callback. A callback takes a CallbackContext, which may contain data if we included it. We’ll use this later to get our Vector2 from movement.
If this script is added to an object in the scene, and the jump key or controller button is pressed, it will now write out “Jump!” to the console.
Now if we want to get the Vector2 from our movement, we can use the CallbackContext.
using UnityEngine.InputSystem;
public class InputHandler : MonoBehaviour
{
private InputMaster inputMaster;
private void Awake()
{
inputMaster = new InputMaster();
inputMaster.Enable();
//Callbacks
inputMaster.Player.Move.performed += Move_performed;
}
private void Move_performed(InputAction.CallbackContext obj)
{
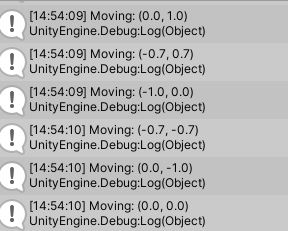
Debug.Log("Moving: " + obj.ReadValue<Vector2>());
}
}
So we can use our callback context to call .ReadValue, and specify the type. This will return a normalized Vector2.
One thing to note is that this will not constantly send input, but only when pressing or releasing. Because of this you may have to do certain things differently that require you to hold a value, such as crouching. Normal bindings without a value specified will be sent as a float, with a value of 1 for pressing, and 0 for releasing. Here’s how we might handle a crouch.
using UnityEngine.InputSystem;

public class InputHandler : MonoBehaviour
{
    private InputMaster inputMaster;

    private bool isCrouching = false;

    private void Awake()
    {
        inputMaster = new InputMaster();
        inputMaster.Enable();

        //Callbacks
        inputMaster.Player.Crouch.performed += Crouch_performed;
    }

    private void Crouch_performed(InputAction.CallbackContext obj)
    {
        isCrouching = obj.ReadValue<float>() == 1;
    }

    private void Update()
    {
        if(isCrouching)
        {
            Debug.Log("Crouching!");
        }
    }
}
This is the basics of retrieving input, and their values as you press them.
Structure
While that is the basic way of retrieving input, when actually working on a full game, it’s not ideal to have everything happening in one script. So my suggestion is to pass this instance to other classes that handle their own individual inputs. I have a core class that creates the input, and then passes the input to all instances of interfaces it finds as its child. Those classes then handle their own pieces of input.
This of course is completely optional, and you’re free to figure out your preferred way of setting up input for your game. But here’s my setup.
using UnityEngine.InputSystem;

public interface IInputReceiver
{
    void ReceiveInput(InputMaster input);
}
public class InputHandler : MonoBehaviour
{
    private InputMaster inputMaster;

    private bool isCrouching = false;

    private void Awake()
    {
        inputMaster = new InputMaster();
        inputMaster.Enable();

        //Callbacks
        IInputReceiver[] receivers = GetComponentsInChildren<IInputReceiver>();
        for (int i = 0; i < receivers.Length; i++)
        {
            receivers[i].ReceiveInput(inputMaster);
        }
    }
}
using UnityEngine.InputSystem;

public class Example : MonoBehaviour, IInputReceiver
{
    private bool isCrouching = false;
    private Vector2 movement = Vector2.zero;

    public void ReceiveInput(InputMaster input)
    {
        input.Player.Jump.performed += Jump_performed;
        input.Player.Move.performed += Move_performed;
        input.Player.Crouch.performed += Crouch_performed;
    }

    private void Crouch_performed(InputAction.CallbackContext obj)
    {
        isCrouching = obj.ReadValue<float>() == 1;
    }

    private void Move_performed(InputAction.CallbackContext obj)
    {
        movement = obj.ReadValue<Vector2>();
    }

    private void Jump_performed(InputAction.CallbackContext obj)
    {
        Debug.Log("Jumped!");
    }

    private void Update()
    {
        if(isCrouching)
        {
            Debug.Log("Crouching!");
        }

        Debug.Log("Currently moving: " + movement);
    }
}
That concludes this tutorial. If you have more questions, or are unsure how to use certain features, I would again point you towards the Unity documentation.
Support
Are you having trouble with understanding this tutorial? Please feel free to contact me via email at KoseckCory@gmail.com or message me on discord at 7ark#1120.
I would love to get feedback from people so I can add and improve these tutorials overtime. Letting me know what you’re confused about will let me update the tutorials to be more concise and helpful.
If you’re interested in supporting me personally, you can follow me on Twitter or Instagram. If you want to support me financially, I have a Patreon and a Ko-fi.
0 comments on “Using Unity: 2019 Input System”Add yours →